The
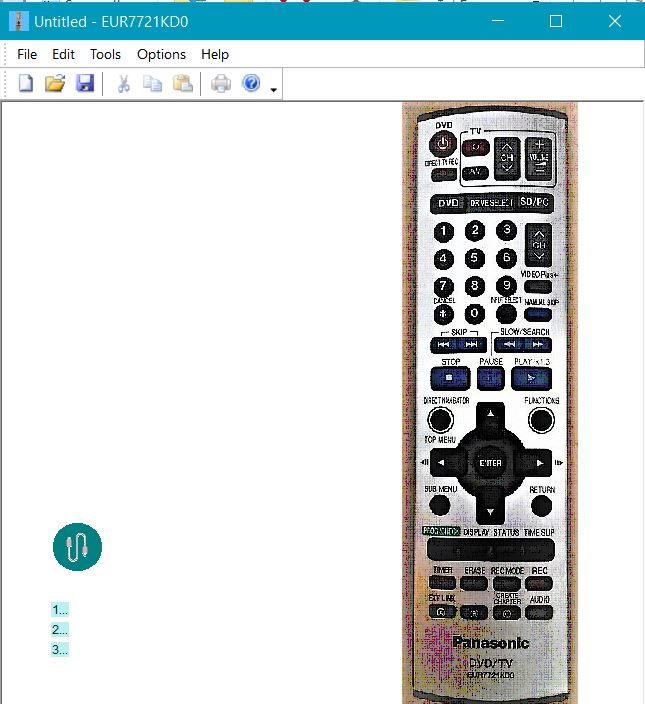
EUR7721KD0.exe Windows program sends key codes to a Arduino via a USB cable when
you click on the buttons of the remote control image. This allows an
Arduino to emulate a Panasonic EUR7721KD0, Sky(Sky),Sky(TV) or Technika
STBHDIS2010 remote control. Three
sketch's for an Arduino are included in the downloadable .zip file. You can
configure the sketch's to control other equipment instead. This program is
free to download and use.
Download the program and unzip it using 7zip or Windows Extract All. Double click it to run it. Read the use instructions lower down for how best to install and use the program.
EUR7721KD0.exe
14 March 2022.
Click on the link here to download the EUR7721KD0.exe program and Arduino sketch. EUR7721KD0.zip x86 32bit size
1.16MB
Requirements:
This 32 bit version of EUR7721KD0.exe is a Microsoft Windows 10 program but it will also run on Windows 7, 8 and 8.1 32 bit and 64 bit versions if you install the latest version of the NET Framework.
You will need to have the 32bit C++ Visual Studio 2019 runtime dlls installed. vc_redist.x86.exe File Size:13 MB.
They can be installed from the Microsoft web site at
The latest Microsoft Visual C++ Redistributable.
On earlier versions of Windows you
might also need to have Microsoft . NET version 5 (Visual Studio 16.8 or later) . NET Framework versions 4.8, 4.7. installed. If it is not already installed on your PC
you can download it from the Microsoft web site at
Microsoft .NET Framework 4.8.
Some antivirus software will block applications the first time they are run.
Bitdefender seems to block every app from small vendors. So if the program does not start have a look at your antivirus.
The first time you run the PicGrinder program Windows 10 Smartscreen might give a
warning window. Just click on more info and then Run anyway. After
that it should start without any problems.
The included sketch's will need compiling and loading to your Arduino with the
Arduino Software (IDE).
This sketch uses Ken Shirriff's IRRemote library. To compile the sketch's you
must install that library. For more info see
http://www.righto.com/2009/08/multi-protocol-infrared-remote-library.html
The most recent code is at
github.com/shirriff/Arduino-IRremote. An IR LED must be
connected to your Arduino PWM pin 3. You must use a 100 ohm resistor in series
with the LED. Driving the IR LED directly from the Arduino will give a fairly
short range, you can extend the range by driving the LED through a transistor or
driver chip. Have a look on the web for examples on how to do that. The EUR7721KD0.exe Windows program sends key codes to a Arduino
via a USB cable when you click on the buttons of the remote image. The sketch
uses the key codes to look up a remote code and sends that out via an infra-red
led. If you have an old spare remote you can break it open and use the infra-red
LED from that or buy a new LED from some where. The com port speed settings in
the the EUR7721KD0.exe Windows program must be the same as in the
Serial.begin(115200); statement in this sketch. If you want you can use other
speeds but they must both match. You can control other kit by changing the
infra-red codes in the sketch in "long TheCode[54]{". Have a look at Ken Shirriff's IRRemote
library for how to read remote infra-red codes.
I used version 2.0.1 of the IRremote library. I have Arduino Uno's.
If you have another type of Arduino you might need to use a later version of the
library. The ouptput pin might change depending on which library version
you use and what type of Arduino you have.
The library version can be changed using the Library manager. Hover your
mouse over the IRremote section to see the Select version drop down.

There are two sketches for sending remote codes included in the zip file.
If you want to send NEC codes without a repeat code you can use the MyRemote.ino
file.Compile with the IRRemote library version 2.0.1.
If you want to send NEC remote codes with a repeat code you must use the
sender.ino file. Compile with the IRRemote library version 3.6.1.
Here's my Arduino Uno wired up to a TNPA1729 board from a Panasonic TX-32PG30
TV. It has a RPM6937-S infra-red receiver on it. The infra-red transmitter led
came from an old remote control. The TNPA1729 board power section wires
are not connected and just hang loose. That was the mains input to the TV and is
not used and you should not connect it.


There's three alternative remote controls under int Remote menu. Sky (Sky) and Sky (TV)and Technika STBHDIS2010 freeview. There's a
LibreOffice Calc spreadsheet of the button codes I used on this web page
https://flimirx.wixsite.com/filecab/eu

The included sketch raw.ino reads raw timing pulses and sends them to the EUR7721KD0.exe program.
To use the IR Monitor mode in the EUR7721KD0.exe program you must have this sketch running on your Arduino.
Select IR Monitor under the Remote menu.
This allows the EUR7721KD0.exe program to display the codes from your remote as bars showing the marks and spaces.
You can use the code that is displayed to configure the MyRemote.ino sketch to
control your other equipment. The codes are not always correct and you
might have to press your remote control button several times to get the correct
code.
If you have two Arduino's you can use one to send IR codes and one to receive
and display the codes. That way you can compare the Arduino sent codes
with the ones from your real remote control. This is best done with two
PC's but you can do it on one PC by opening the EUR7721KD0.exe program and
connecting to the receiving Arduino and then open a second copy of the
EUR7721KD0.exe program changing the com port and connecting to the sending
Arduino.
If you want to see the pulse timings for your remote open the Serial Monitor of your Arduino CC program with the port speed set to 115200.
Point your remote at your Arduino board and you will see the pulse timing figures.
You can make your sending arduino send IR codes by typing the codes sent by the
EUR7721KD0.exe program in the Serial Monitor of your Arduino CC program. e.g.
"B131".
The sketch's have only been tested on a Arduino UNO board.

The Swap bits dialog can be used to do a bit reversal of 32 bit hex values. The source file should hold a list of hex codes each on a seperate line in the format 0x1FEC03F or without the 0x as 1FEC03F.
I added this dialog when I was trying to use my codes with later version of the Arduino library. In early libraries IR codes are sent MSB first. In version 3??? IR codes are sent LSB first.
It's confusing, I gave up trying to sort it out and did a work around instead.
The latest firmware for the Technika STBHDIS2010 freeview box can be downloaded
from my Google drive
...here....
The EUR7721KD0.exe program is free to download and use. The programmer accepts no responsibilty for any loss or damage you might
incur using the program.
You use the program entirely at your own risk. It's difficult to see any way that
you could damage your PC with this program. It's possible you might
damage you Arduino if you wire it up wrong but that's your risk. It's best to
plug your Arduino into a cheap external hub. That helps to protect your PC
in case you have any accidents with your Arduino board. This disclaimer
is here to protect the programmer just in case..
Back to the home page
Last updated 19 March 2022.